midi studio+
one clip in, endless directions out.
midi studio+ reads the harmony under any clip — key, chords, degrees — then helps you rework it: smart, theory-based suggestions, chord-block reharmony, playable pitch & rhythm blocks, and an export that writes it all back. This manual covers every tab and control, and a set of step-by-step walkthroughs from real clips.
 built by Lux Cache · for Ableton Live 12 Suite
what it is
Take any MIDI clip — a pad progression, a topline, a bassline, a drum groove — and midi studio+ lays the theory over it, offers you directions to take it, and writes the result straight back into your Ableton Live session.
It's five tabs in one window: analyse reads the clip (key, chords, degrees,
out-of-key notes), suggest offers one explained edit at a time, harmonise
turns the changes into clickable chord blocks, design gives you playable pitch and
rhythm blocks, and export writes the result to the clip, to tracks, or to
.mid files.
The thread that runs through all of it: everything is auditioned before it lands. Suggestions a/b against the original, chords have their own ▶, the design field renders as you drag — and nothing touches your clip until you say so.
It isn't an instrument and it doesn't generate from nothing — you point it at a clip that already exists, hear some directions, and keep the ones that earn it. One focused pass, entirely undoable.
install & requirements
- Ableton Live 12 Suite, build 12.4.5 beta or newer (the build that ships the Extensions SDK).
- macOS or Windows.
- The
midi-studio+.ablxextension file.
- In Live, open Preferences → Extensions.
- Drag the
.ablxfile into the Extensions pane. - Restart Live so the Extension Host picks it up.
- Right-click a MIDI clip — you should see a midi studio+ submenu. You're ready.
opening the tool
Right-click a MIDI clip — in Session or in the Arrangement — and pick from the midi studio+ submenu. The window opens with your clip loaded and already analysed.
Audio works too: point it at an audio clip and the analyse lens senses the notes straight off the recording.
Clips longer than one window are split into patterns — step through them with the ‹ n / n › control in the bottom-right. Every tab respects the pattern you're on.
the window
One modal, five tabs — analyse → suggest → harmonise → design → export — with a persistent footer carrying the LC mark, a live hover-help line, and the cancel / next buttons.
The header always shows which clip you're working on, the audition voice, the note count and key, plus undo / redo. The footer hint line never goes blank — whatever is under your cursor, it explains.
the clip chip is a browser
The clip name in the header isn't just a label. It lists every distinct MIDI clip in your
Set — duplicates folded into one entry (that's the ×3) — and its ‹ ›
arrows step between them without closing the window. Each clip keeps its own processing,
so you can work through a whole project in one sitting and export at the end.
how you touch it
Same language as sample studio+ — no sliders, no bordered buttons. A handful of gestures covers the whole tool.
| gesture | does |
|---|---|
| click a heading | toggles it on / off — grey when off, dark when on. |
| drag a number | scrubs the value up / down. |
| click a value | cycles through its options. |
| ‹ › | steps through whatever it sits next to — patterns, suggestions, chord choices. |
| ∗ | surprise me — rerolls the thing it belongs to. |
| ▶ / space | auditions — a chord block, a suggestion, the whole pattern. |
Light theme, blue accent, lowercase labels, Suisse Int'l, the LC mark in the corner. Whatever is under your cursor, the footer explains it.
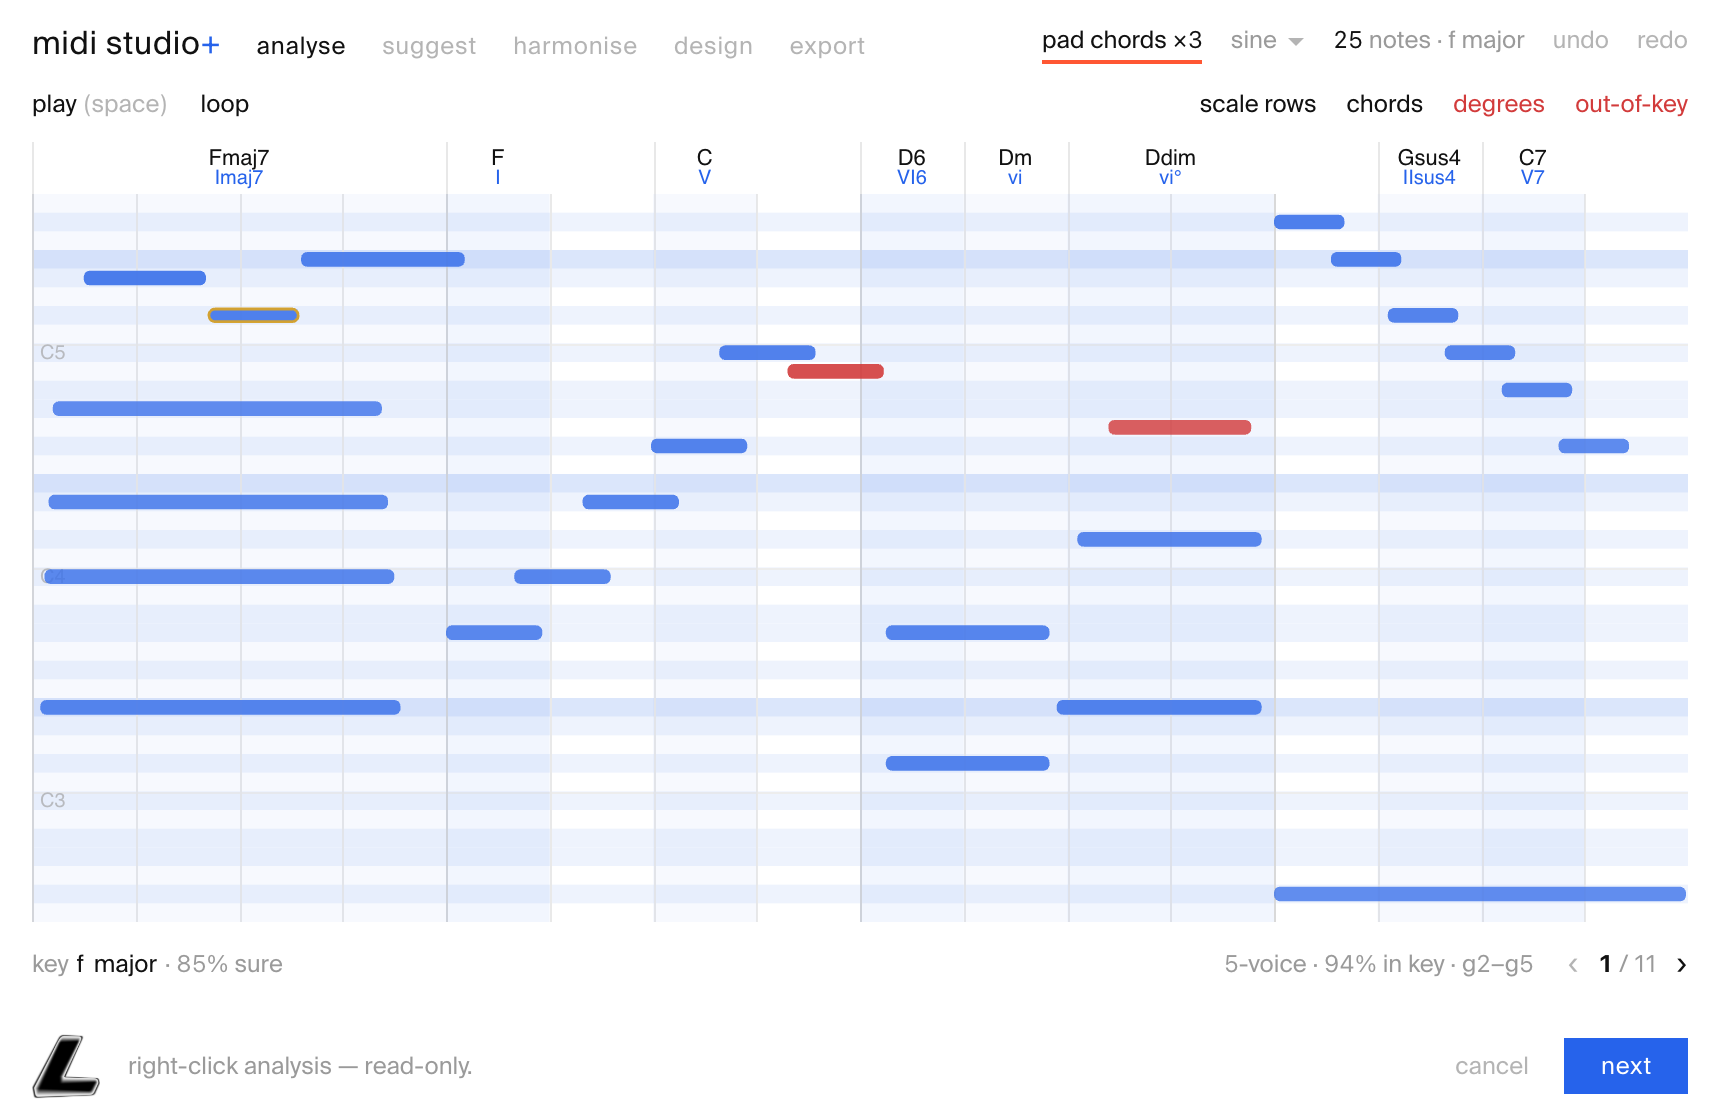
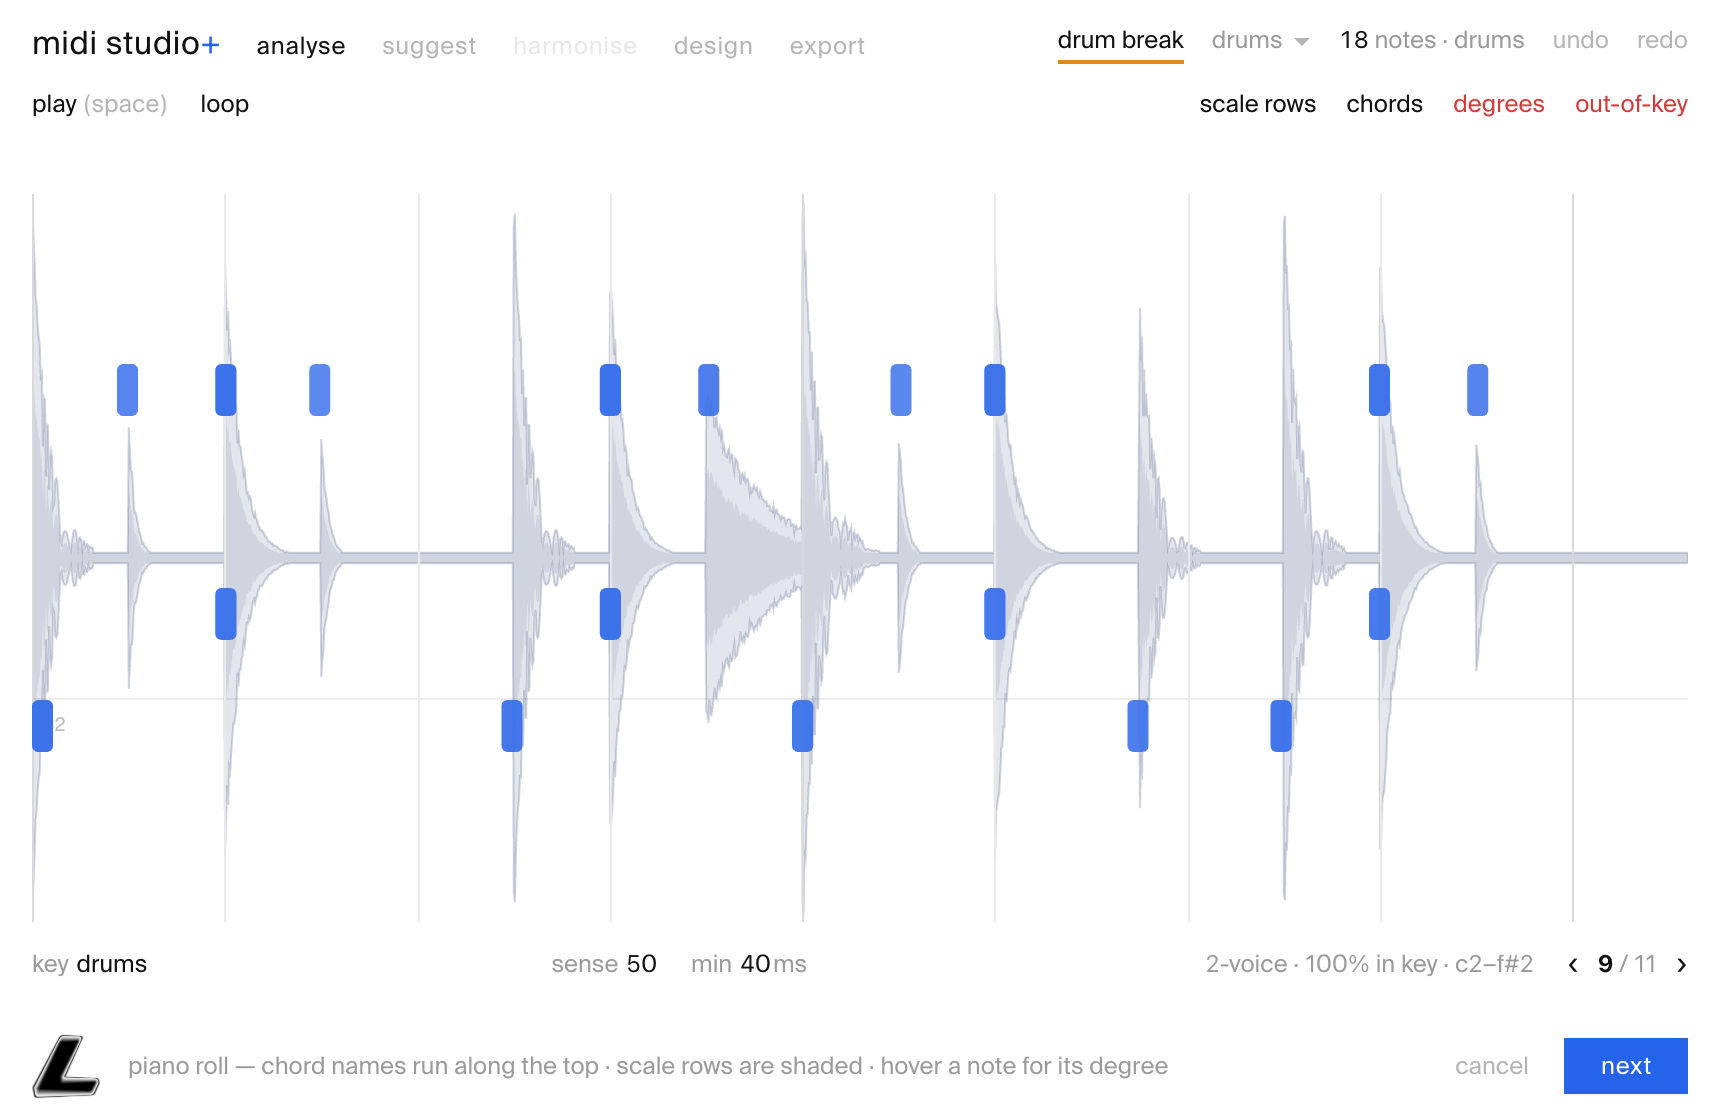
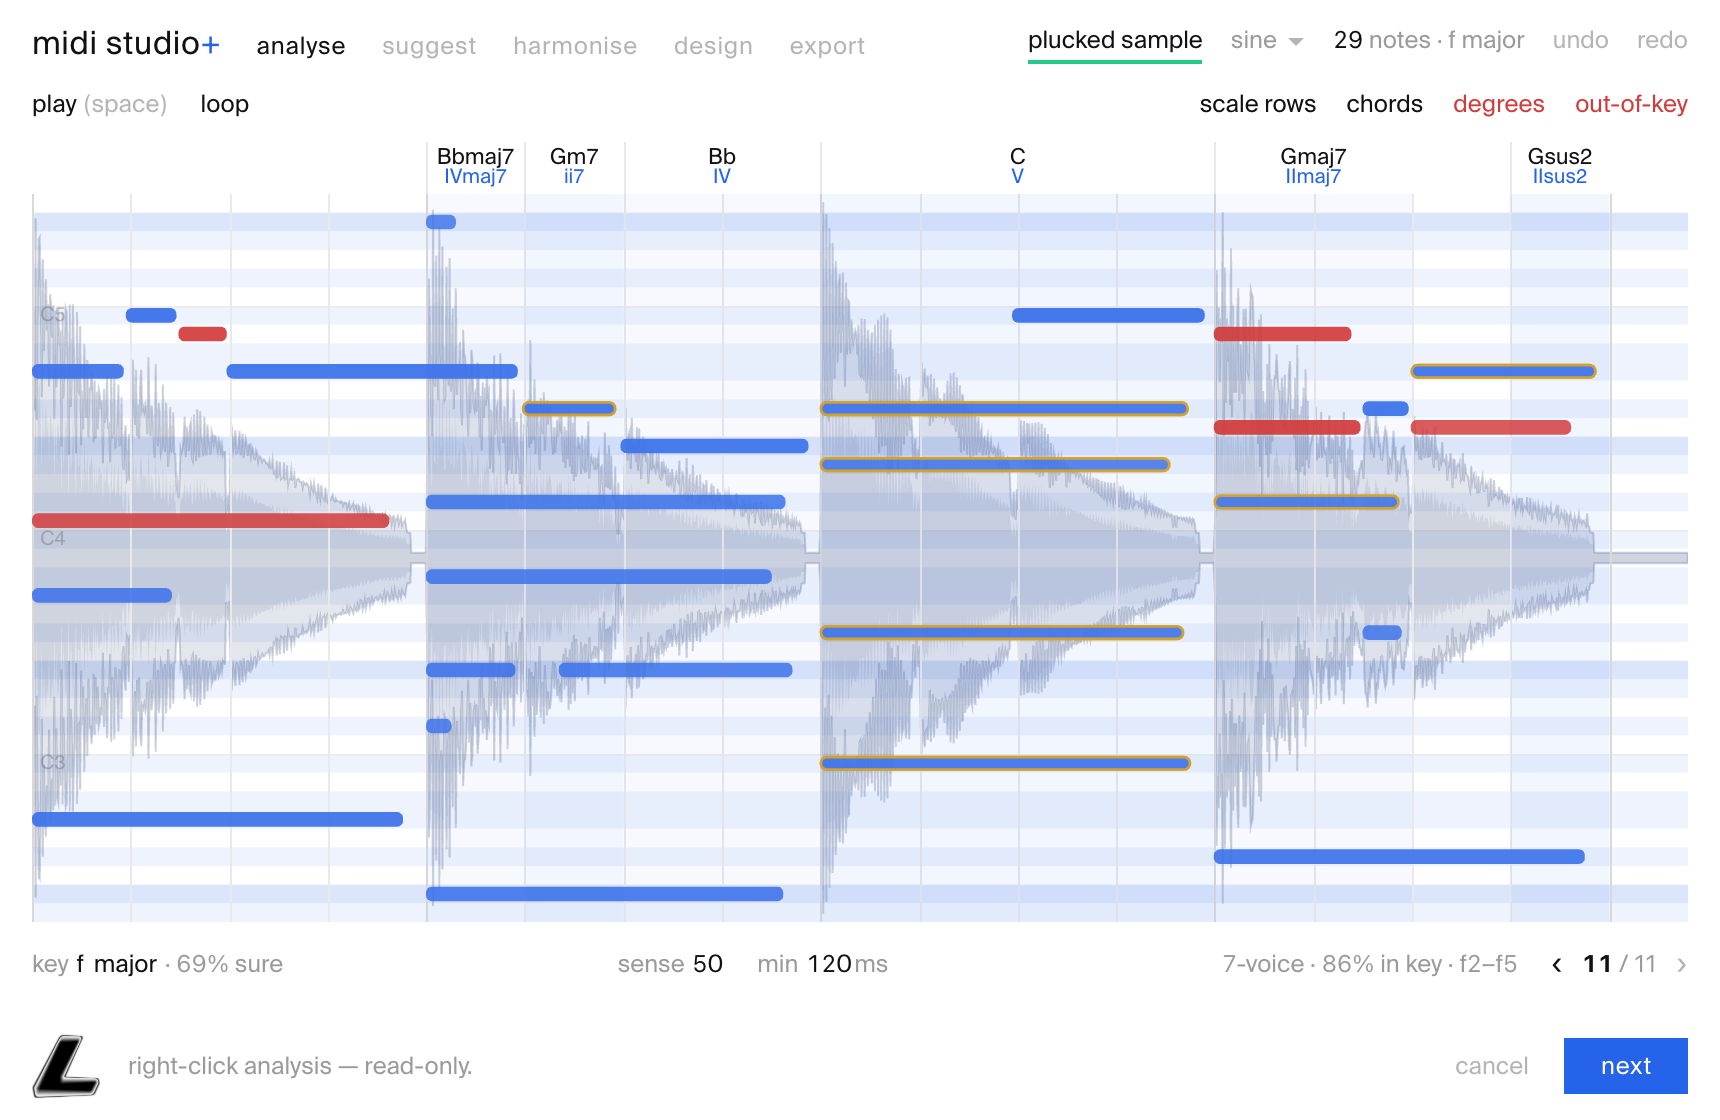
1 · analyse
The harmony lens — read-only. A piano roll with the theory layer Live never drew: chord names run along the top, scale rows are shaded, and you can hover any note for its degree.
what it shows
- key — detected, with an honest confidence % next to it (and a manual override);
- chords — the chord over every bar, named;
- degrees — roman numerals per chord, scale degrees per note;
- out-of-key — stray notes flagged red;
- scale rows — in-key rows shaded behind the roll.
Each layer is a toggle along the top — scale rows · chords · degrees · out-of-key — so the roll only shows what you're asking about. The footer keeps a running readout: voice count, how much of the clip is in key, and its range.
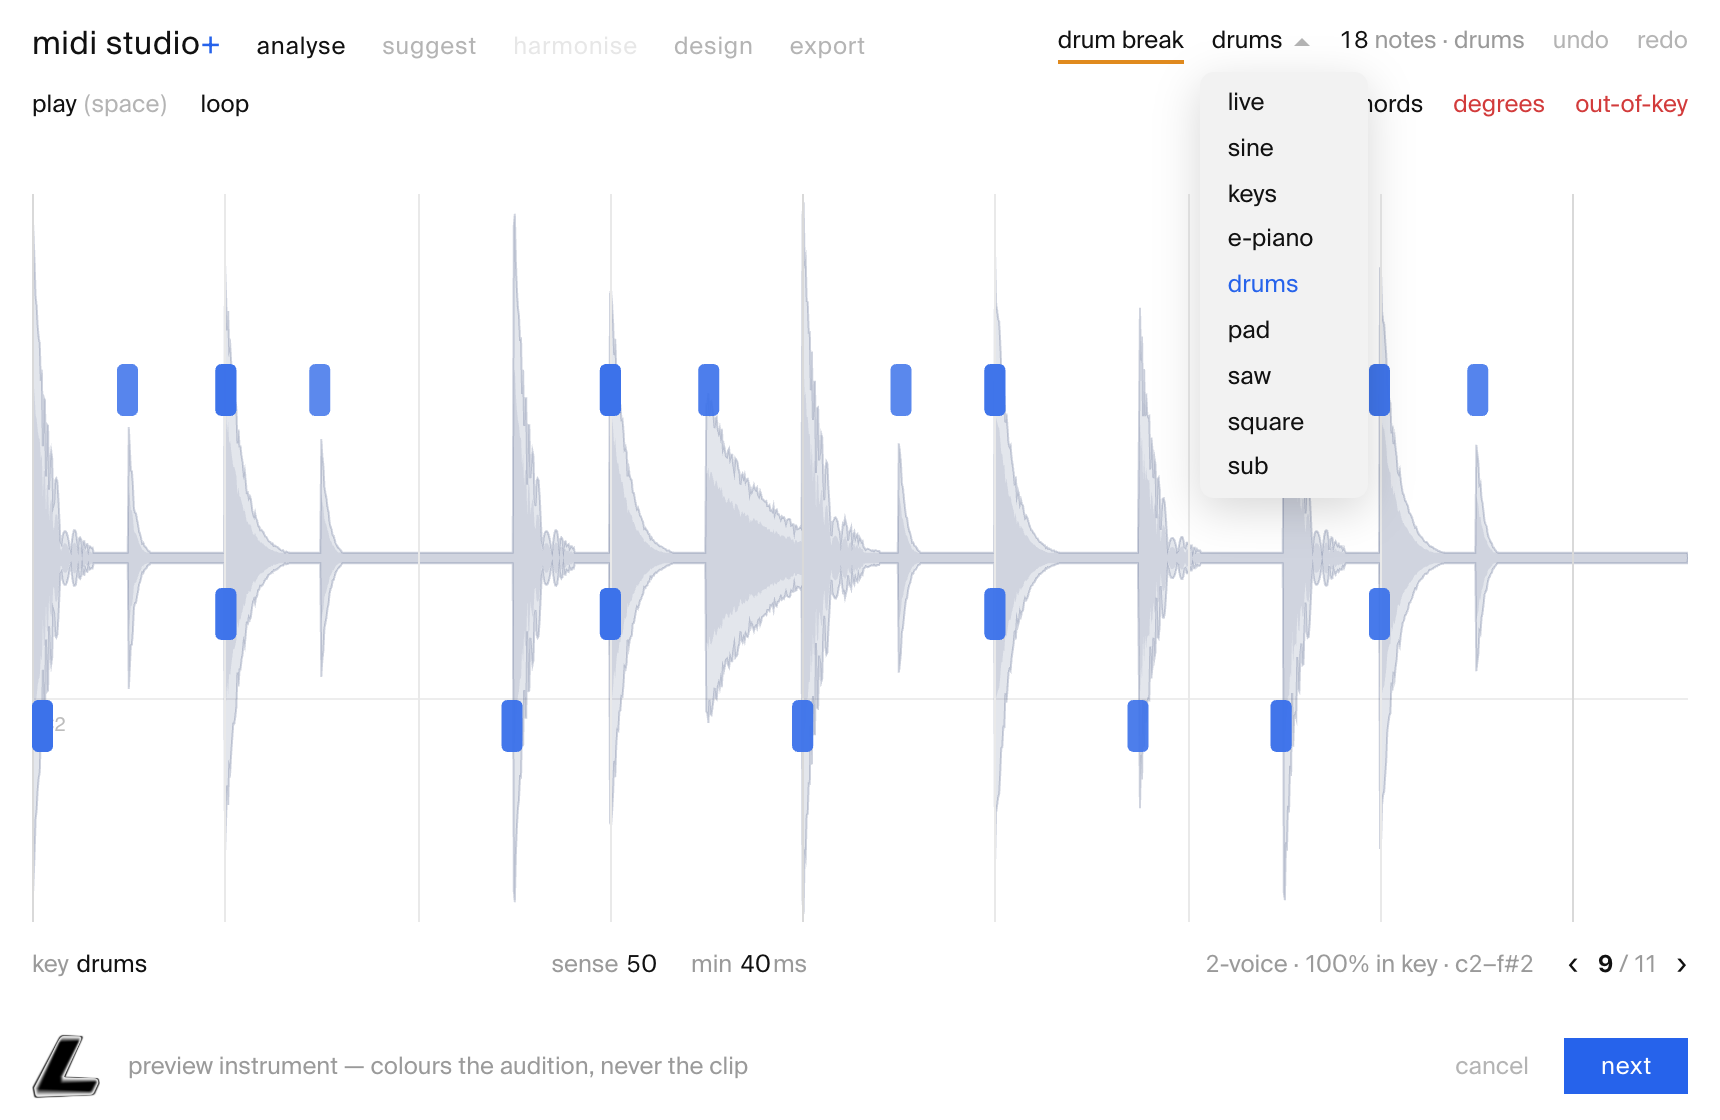
drums are drums
Point it at a groove and it reads as drums — no fake key invented for a beat. You still get the roll, the voices and the pattern view.
2 · suggest
Theory-based suggestions, one at a time. Each arrives in plain words, ranked — flick through them, a/b against the original, and apply only what earns it.
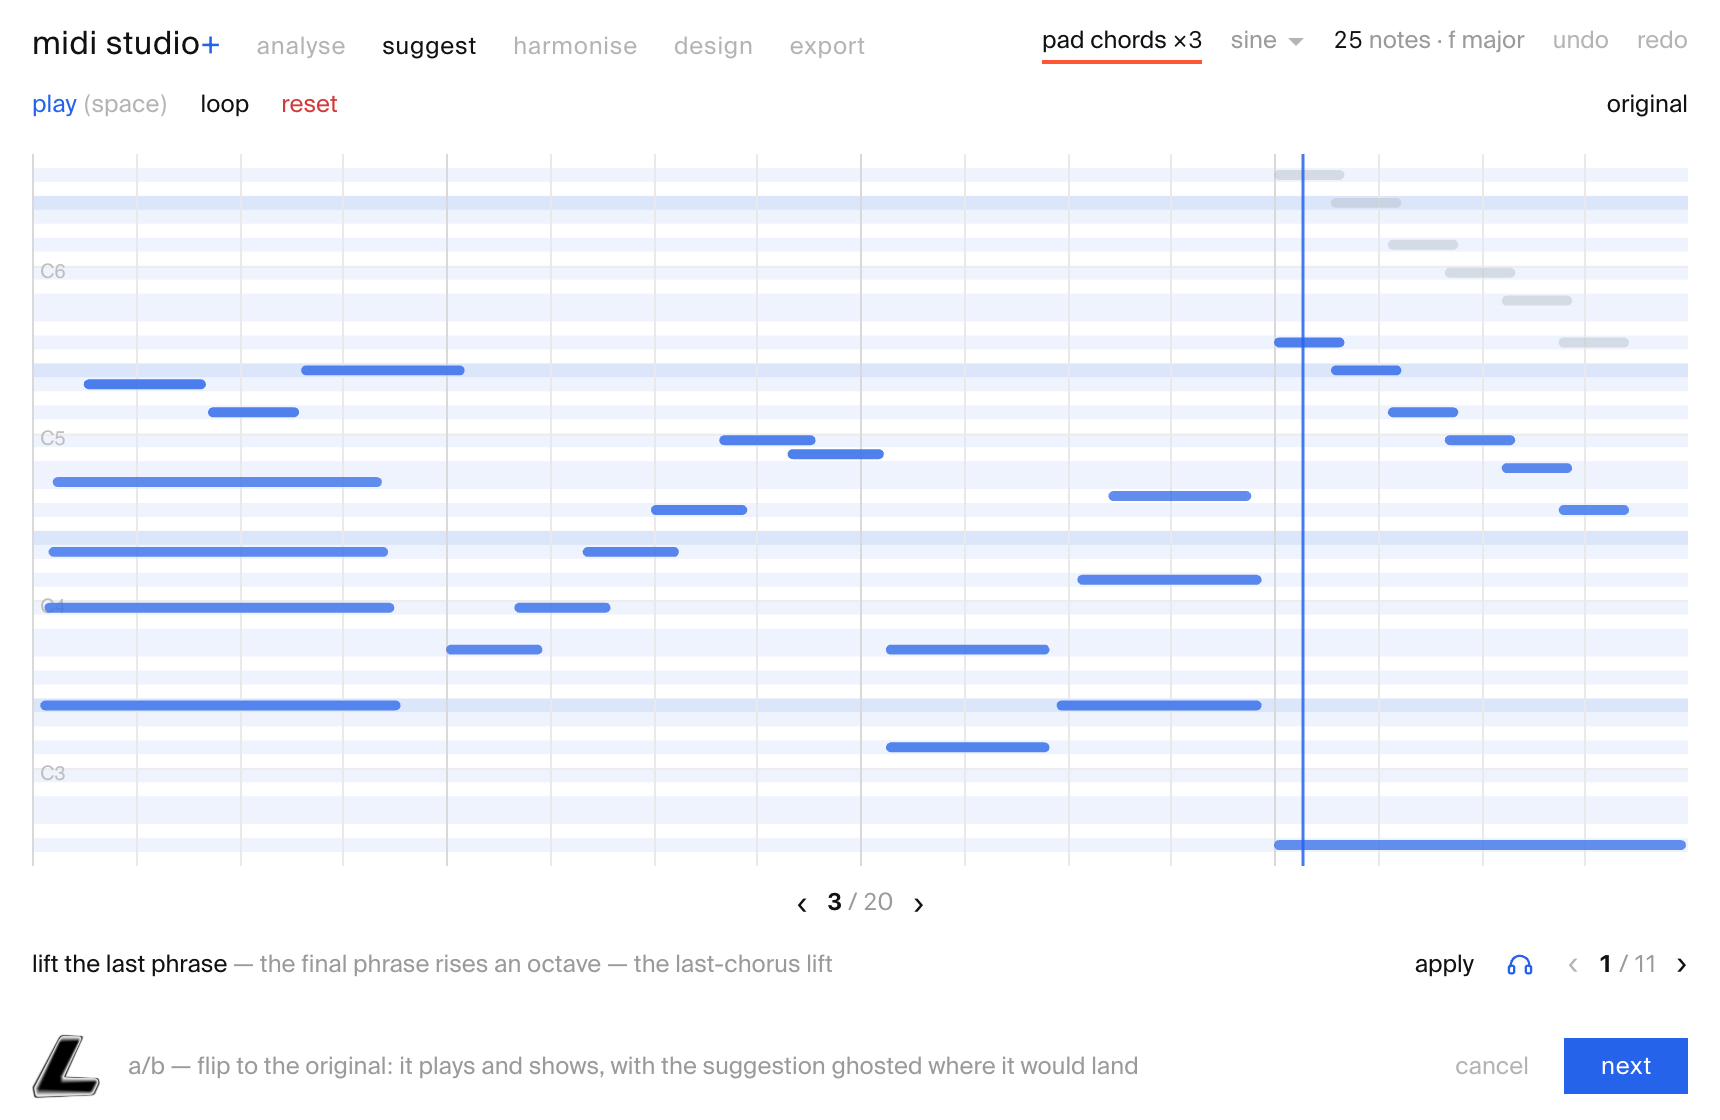
the loop
- Read the suggestion — it names what it wants to change and why, in one line.
- Hear it — space plays, the headphone toggle keeps auditioning as you browse.
- a/b it — hold original: the source plays and shows, suggestion ghosted in place.
- apply to take it — or ‹ › to the next one. reset walks everything back.
Suggestions start safe and get bolder as you flick deeper. The note colours tell the story: green is added, grey is the original it replaces.
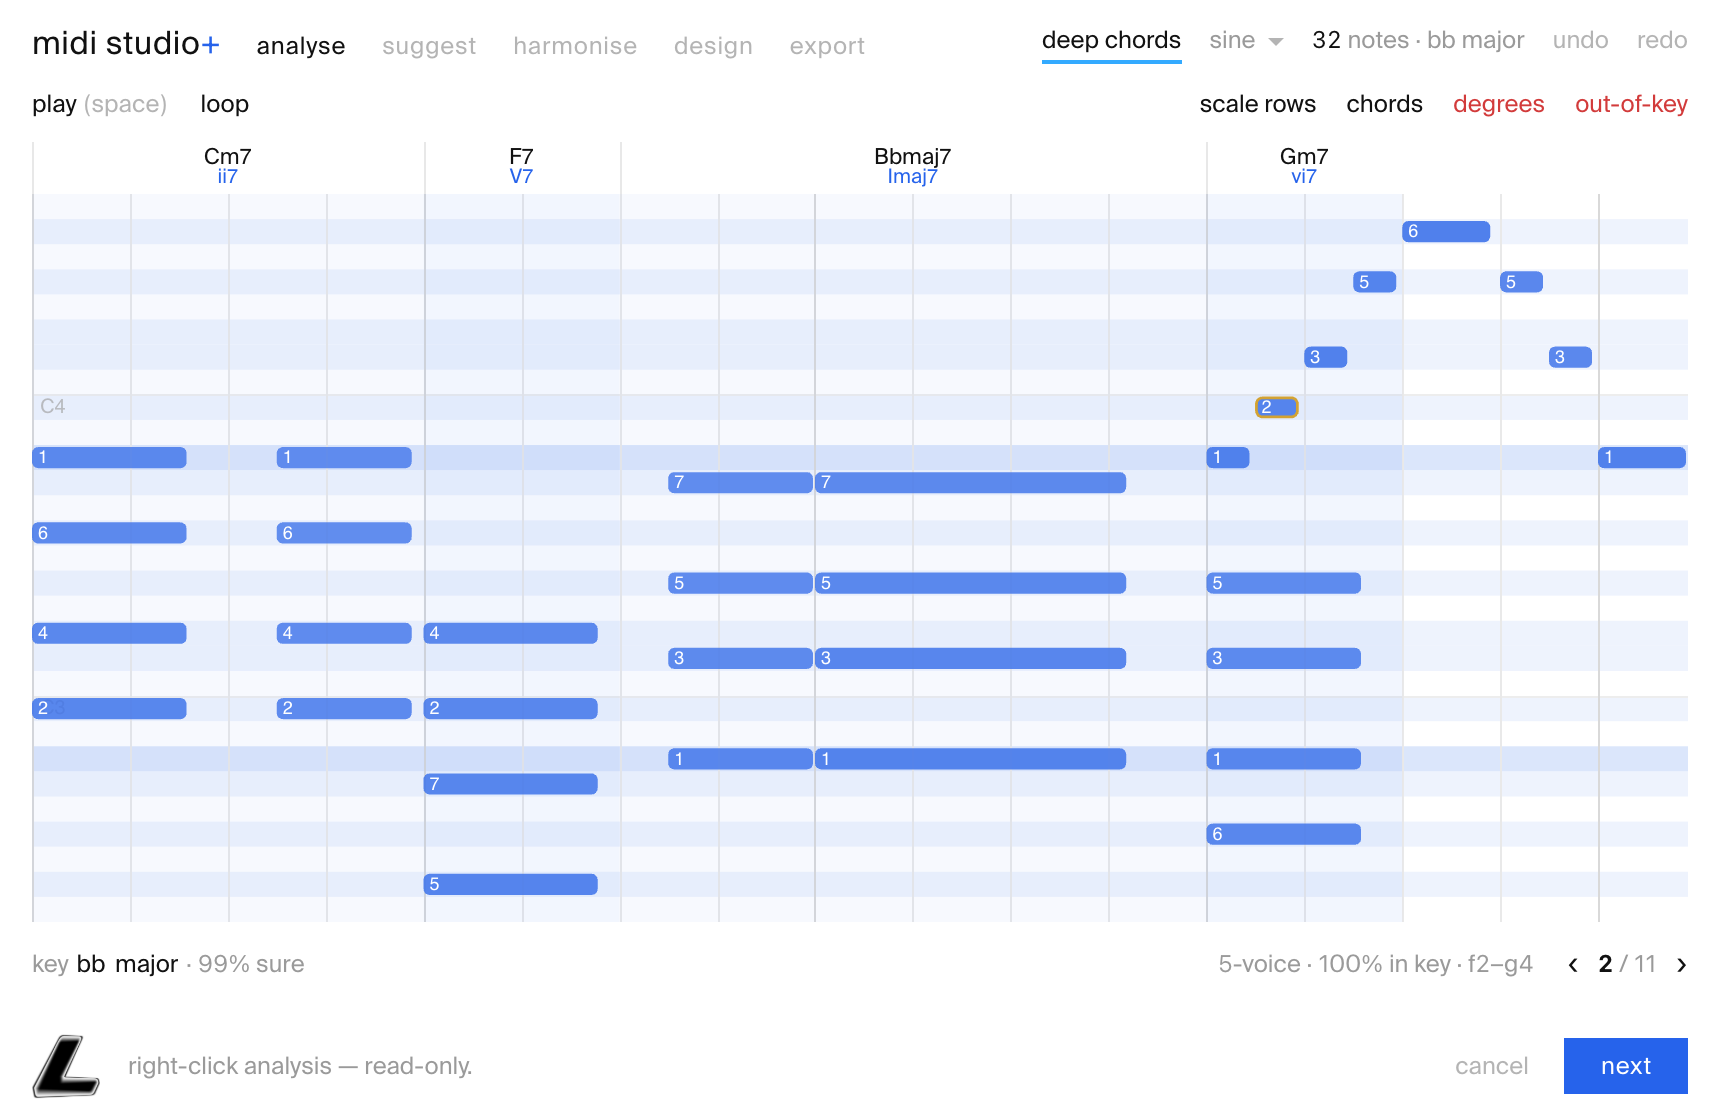
3 · harmonise
The clip's changes as a strip of coloured chord blocks — and every block is a control. Reharmonise by clicking, hearing, locking and rerolling, not by music theory homework.
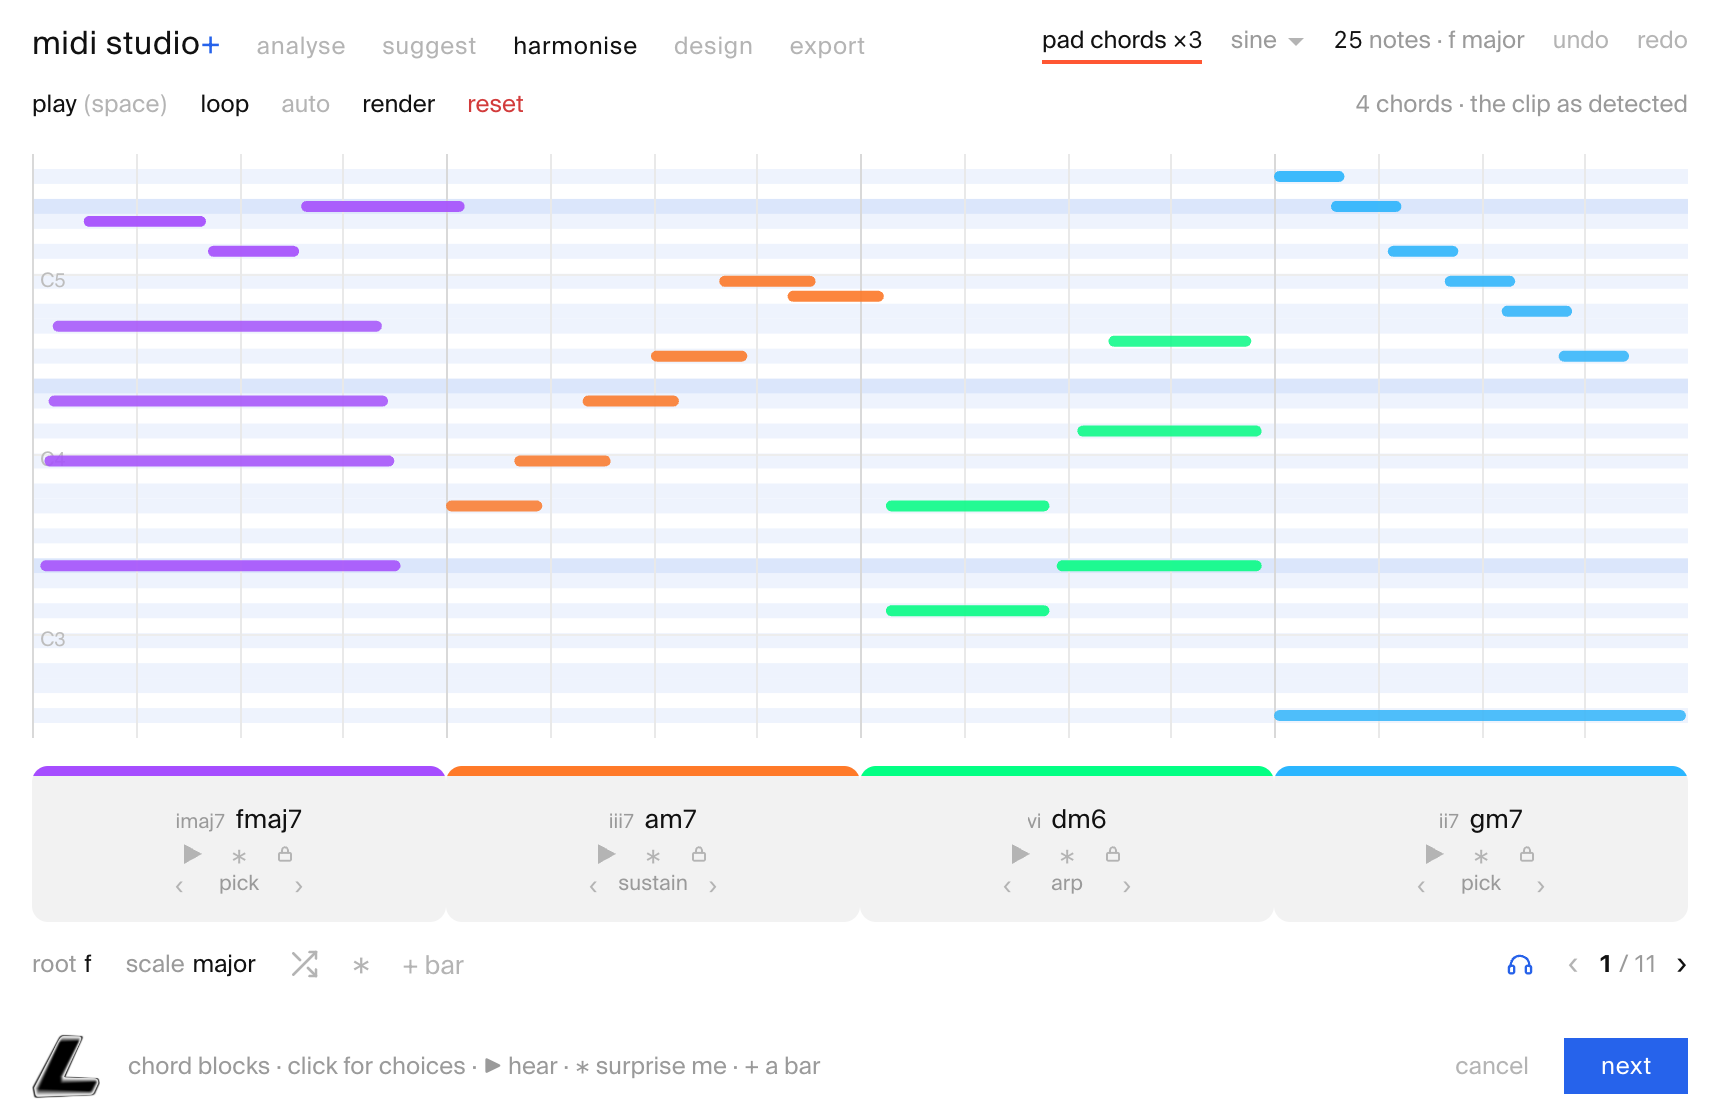
per block
- click the block for chord choices;
- ▶ hear just that chord in context;
- ∗ surprise me — reroll it;
- lock what's working so rerolls leave it alone;
- ‹ style › — how the chord plays: sustain, pick, arp…
- drag ↕ — voicing density: pull a block down to thicken the chord under the material, up to thin it back (0 = just the conformed notes);
- drag ↔ — reorder the progression; the shuffle icon randomises the order in one click.
the whole strip
Underneath: root and scale pickers, a shuffle, a global ∗, and + bar to extend the progression. auto keeps it auditioning, render writes the new harmony onto the notes, reset walks it back.
Rendering folds the new harmony into the clip's foundation — the chords re-detect and the blocks reset, so you can immediately reharmonise the result. Stack passes as deep as you like; ⌘/Ctrl+Z steps back through every bake.
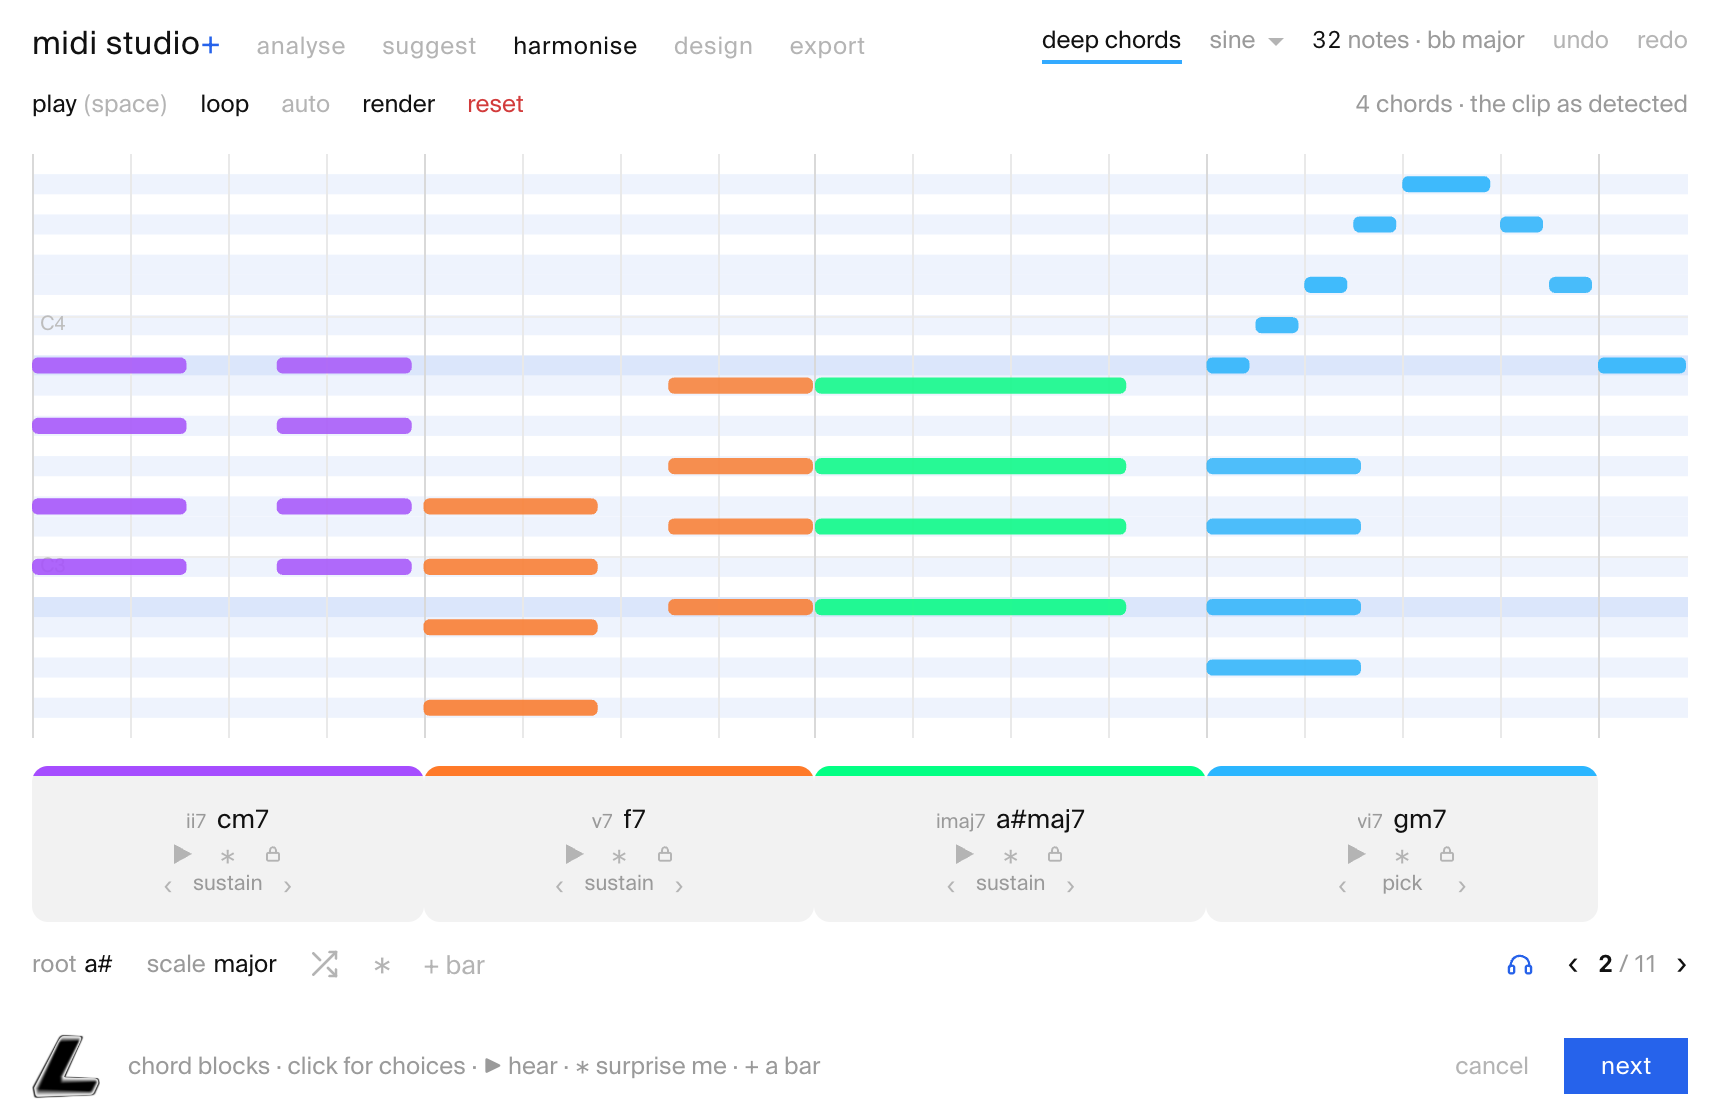
The harmonise tab needs pitches — on a drum clip it sits this one out.
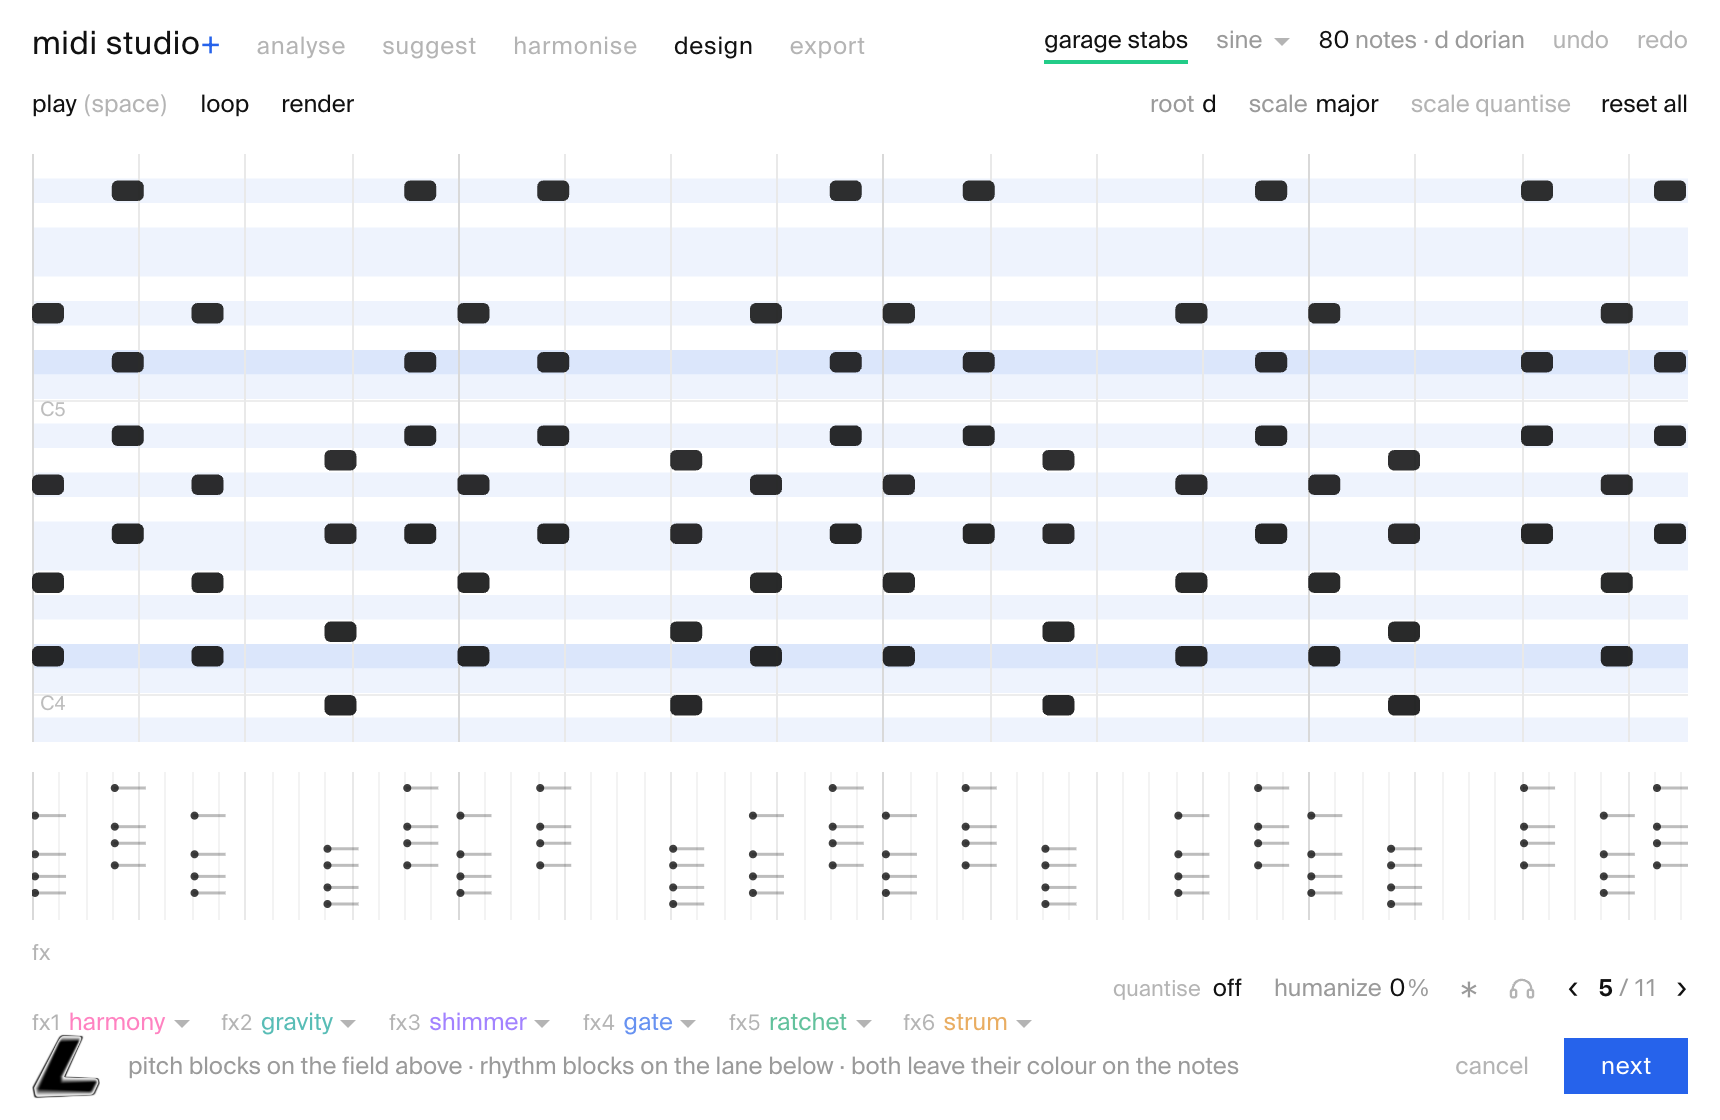
4 · design
Blocks you can play. Pitch blocks live on the note field above, rhythm blocks on the lane below — and both leave their colour on the notes they touch.
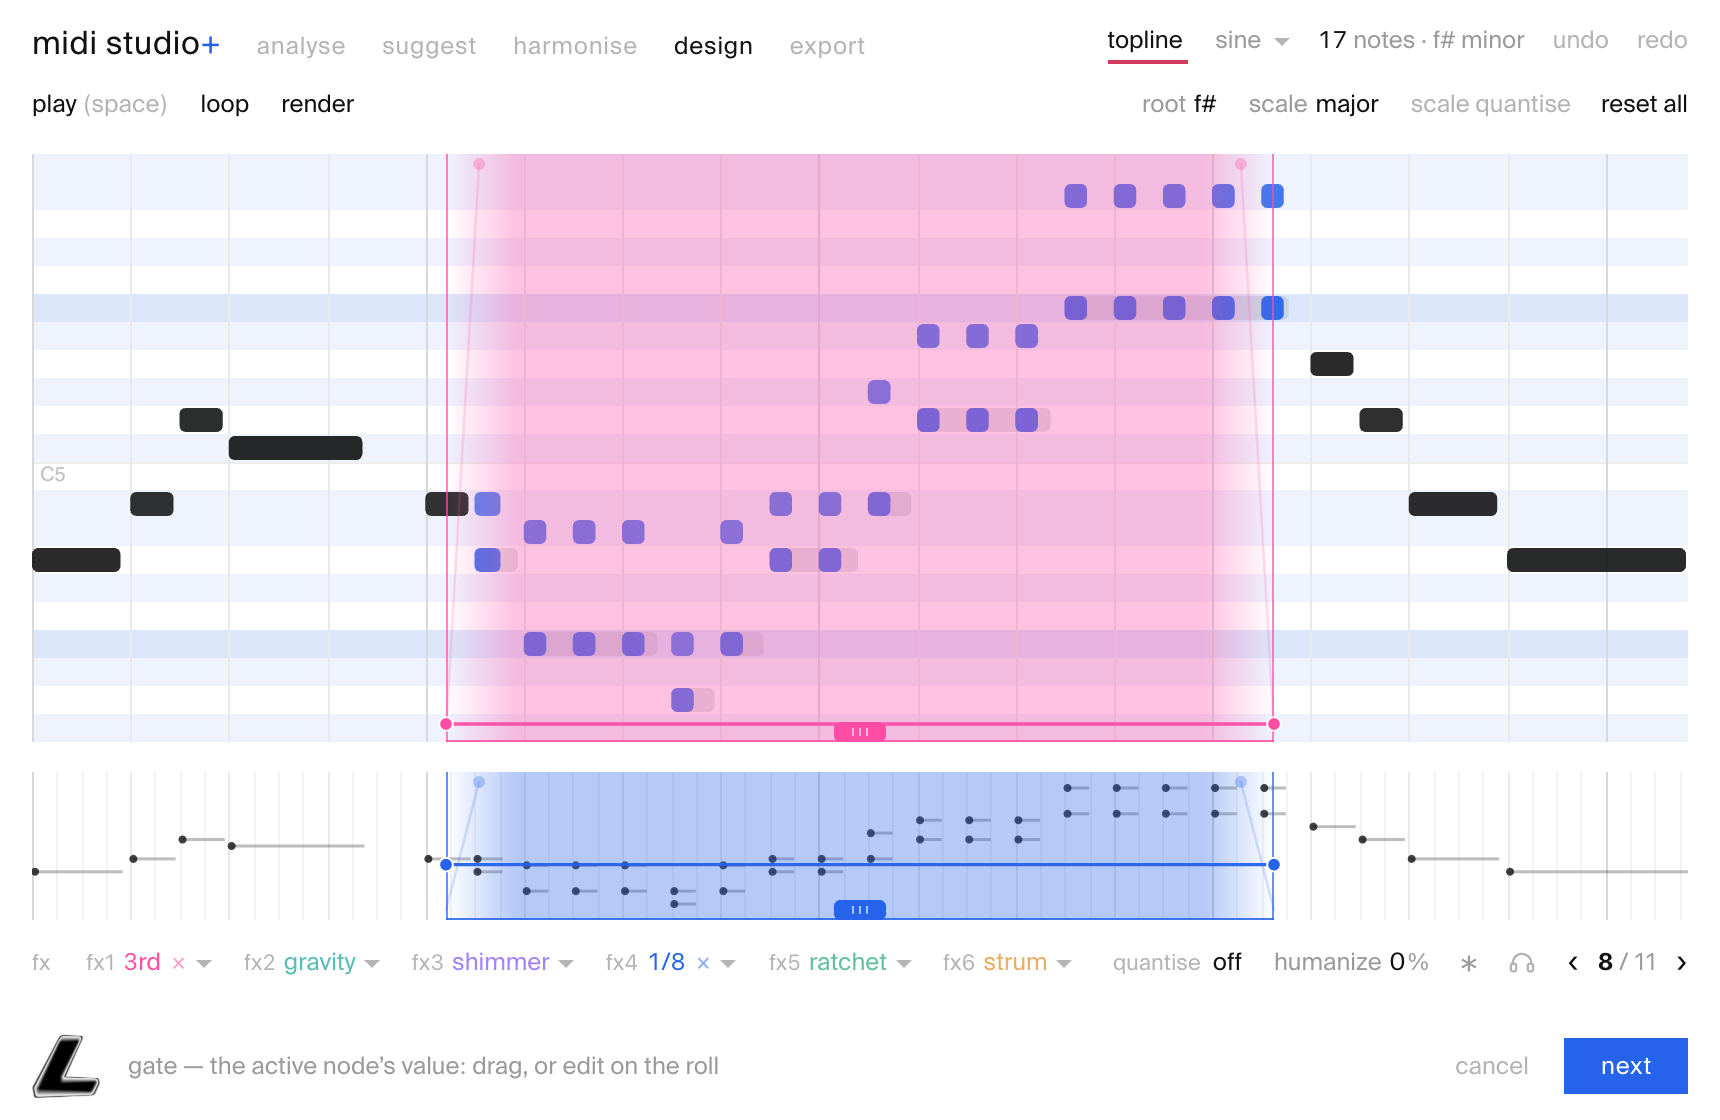
the blocks
harmony
Stack an interval onto the line — a 3rd, a 5th, further out.
gravity
A pull on the pitches — drag its curve right on the roll.
pedal
Hold a pedal tone under the phrase while the top keeps moving.
shimmer
Sprinkle octave sparkle over the top of the part.
gate
Chop the lane to a grid — 1/8, 1/16, your call.
ratchet
Repeat hits into rolls where the block reaches.
strum
Fan stacked notes apart like a strummed chord.
push
Lean the timing ahead of or behind the beat.
Each side has three fx slots and a ∗. randomise all throws a whole new direction onto the clip; reset all takes you home. The pitch side also carries root, scale and scale quantise, so experiments stay in key when you want them to.
The design tab re-times whatever the harmonise tab produced — reharmonisation, density and reorder all flow downstream. And render here bakes the designed clip into the foundation too, so analyse → harmonise → design → render → round again.
quantise, then humanize
Last in the chain, by design: quantise snaps the grid, then humanize puts the feel back on top. Drag the % to taste.
5 · export
Three ways out, one naming pass. Choose what to write, name it with tokens, and send it to clip, to tracks, or to .mid.
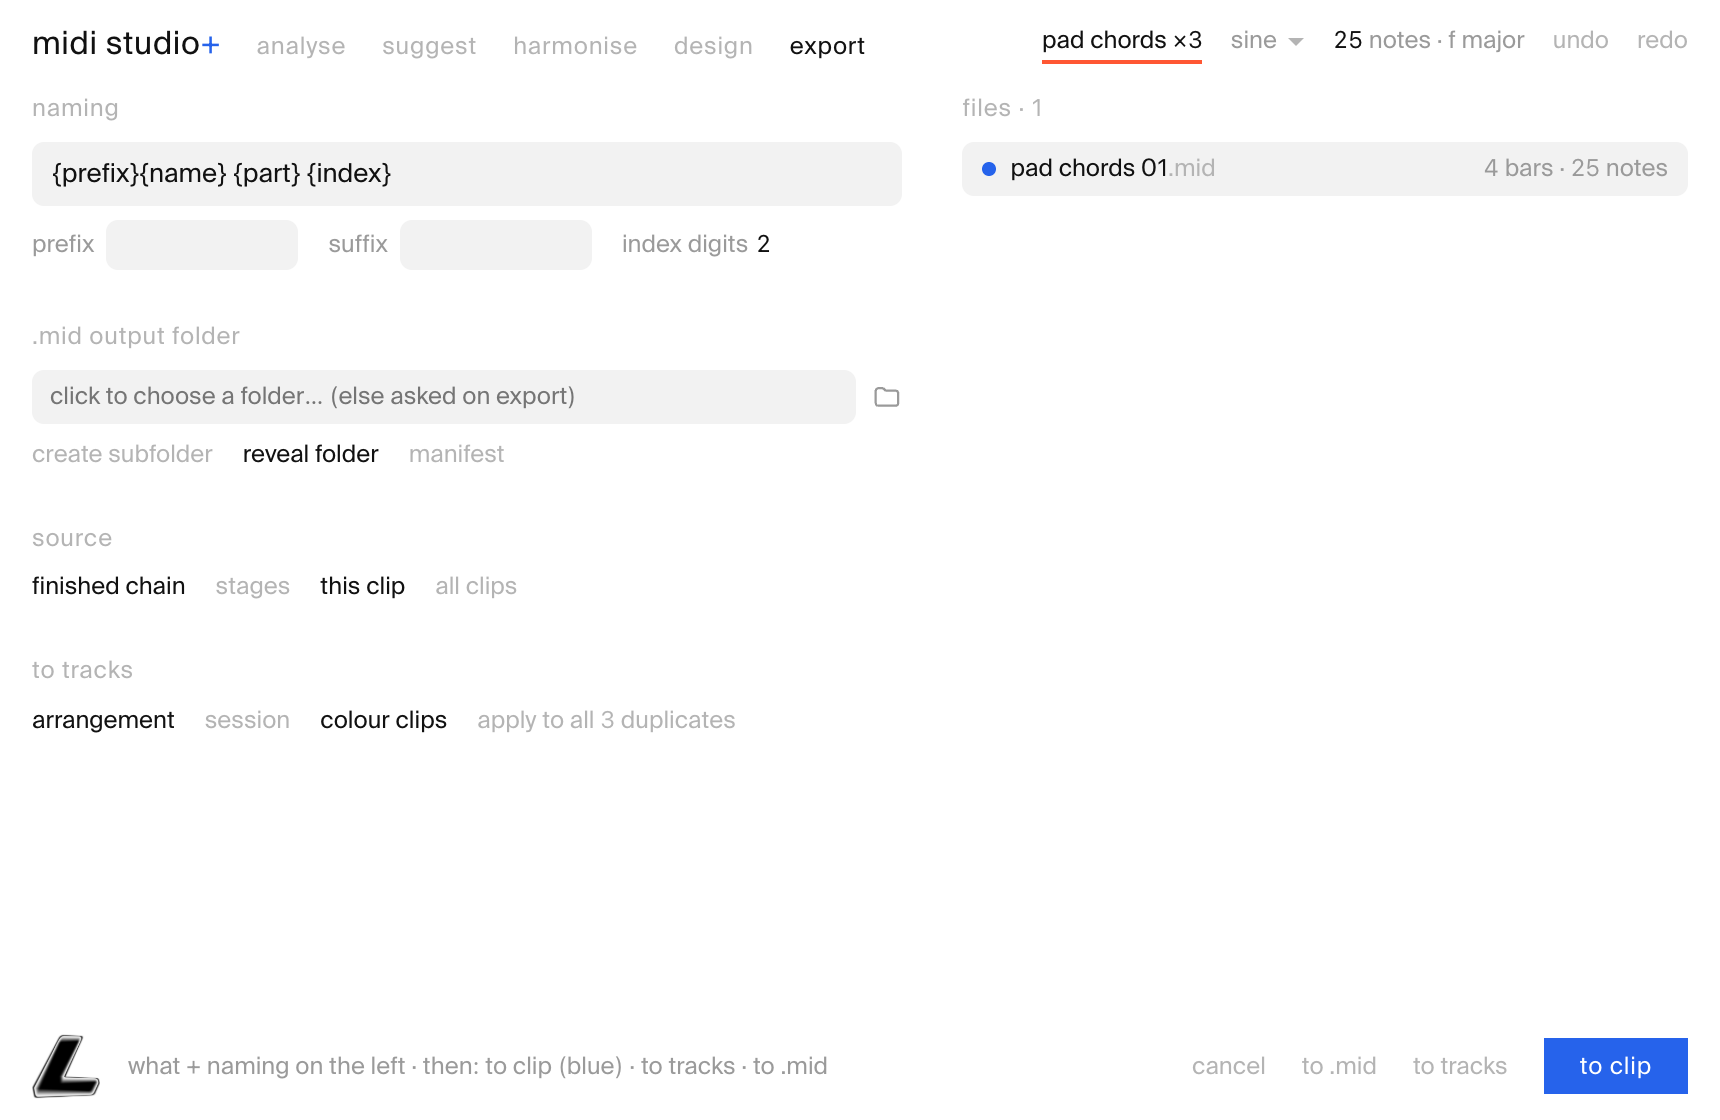
what gets written
| control | does |
|---|---|
| naming | a token schema — {prefix}{name} {part} {index} — with {pattern}, {key}, {bpm} and {date} available too. Write a token in UPPERCASE to capitalise its value. |
| source | what to export: the finished chain, every stage along the way (with optional per-stage clip colours), this clip or all clips you worked on. Long clips can export joined, or one item per pattern ({pattern} names them). |
| to clip | writes straight back into the clip — with apply to all duplicates when the same clip lives in several places. |
| to tracks | new clips on new tracks — arrangement or session, with colour clips to keep them organised. |
| to .mid | files on disk — output folder, create subfolder, reveal folder, optional manifest. |
Writes into your session land as one undo step — ⌘/Ctrl+Z in Live takes the whole thing back.
key & chord reading
Everything midi studio+ does leans on its read of the clip — so the read is honest about itself.
- The detected key shows its confidence % right on screen — an 85% is an 85%.
- Manual override — click the key readout to switch from auto to your call; every layer updates around it.
- Chords are named per bar with their roman-numeral degrees, so you can see the function, not just the label.
- Drums are read as drums — no key is invented for a groove.
Key detection is strongest on fuller, polyphonic material and shows lower confidence on short or monophonic clips — that's inherent to reading harmony from few notes. The % is shown rather than hidden; when you know better, override it.
audio in
The analyse lens doesn't stop at MIDI — open it on an audio clip and the notes are sensed straight off the recording, with the waveform ghosted behind them.
sense sets how eagerly it hears notes; min discards blips shorter than the threshold. The footer keeps the same readout as MIDI — voices, % in key, range.
routing into Live
The built-in voices are stand-ins. Pick live — the top entry in the voice dropdown — and every audition streams into Ableton over network MIDI and plays through a real instrument on one of your tracks.
one-time setup
- Enable the network session. macOS: Audio MIDI Setup → Network → enable Network Session 1 (the ⋯ next to live in the dropdown pops this dialog for you). Windows: install the free rtpMIDI — same protocol, same steps.
- Point a track at it. In Live, create a MIDI track with the instrument you want to hear, set its MIDI From to the network session, and arm it.
- Pick live in the voice dropdown. The hint bar reports the session state, and auditions start the moment it links up.
From then on everything you'd normally hear on the sine — the transport, a chord block's ▶, hover previews — plays through your own sound. No sound? Check the track is armed and its input is the network session. Outside Live, or with no session, it falls back to the built-in voices silently.
Routing changes what you hear, never what gets written — exporting still goes through the export tab, and the clip keeps its own device chain.
walkthroughs
Five short recipes from real clips. Each starts at a right-click and ends with something written back.
read a progression you recorded
You played some pad chords in and want to know what they actually are.
- Right-click the clip → midi studio+. It opens on analyse, already read.
- Check the key readout — f major · 85% sure. Wrong? Click it and override.
- Toggle chords and degrees — every bar names itself, function included.
- Toggle out-of-key — the red notes are your colour (or your mistakes — your call).
- Hover any note for its degree; step longer clips with ‹ ›.
Result: you know your key, your changes and your outliers — without writing anything.
fix one bar of a pad progression
The progression works except one bar that never sat right.
- Open the clip → suggest tab.
- Flick ‹ › until a suggestion names your bar — “recolour the a#maj7 bar — carries most of the tune.”
- space to hear it; hold original to a/b, with the suggestion ghosted in place.
- apply if it earns it. Keep flicking — suggestions get bolder deeper in.
- Done → export → to clip.
Result: one surgical change you heard before you kept it — and reset was always there.
reharmonise a loop
Same notes, new changes — take a static loop somewhere richer.
- Open the clip → harmonise tab. The progression appears as coloured chord blocks.
- Click a block for choices; ▶ hears each candidate in context.
- lock the chords that already work. ∗ the ones that don't.
- Give blocks a style — sustain, pick, arp — and + bar if the loop wants to grow.
- render writes the new harmony onto the notes; export sends it on.
Result: a reharmonised loop you built by ear, one block at a time.
groove up static stabs
A flat, gridded part that needs movement and feel.
- Open the clip → design tab.
- Drop gate on the lane to chop the rhythm; stretch it over the bars you want.
- Add strum or ratchet where the part should open up.
- On the field, try shimmer for sparkle or pedal for weight — scale quantise keeps it in key.
- Too tidy? humanize. Too loose? quantise — then humanize back on top.
- Or just hit randomise all until something grabs you, and reset all when it doesn't.
Result: a part with motion — every block's reach visible as colour on the notes.
write it back, three ways
You've got something — now get it out without losing anything.
- Go to export. Set the naming —
{prefix}{name} {part} {index}— and watch the file list preview update. - Pick the source: the finished chain, or every stage of it.
- to clip to replace in place — with apply to all duplicates if the clip lives in several scenes.
- to tracks for new clips alongside — session or arrangement, coloured.
- to .mid for files on disk — folder, subfolder, manifest.
Result: the work lands where you want it — and Live's undo takes it back in one step.
audition through your own instrument
Stop deciding on a sine what you'll play on a Prophet.
- Enable the network session once — routing into Live has the steps (macOS: Network Session 1; Windows: rtpMIDI).
- In Live, arm a MIDI track with your instrument, MIDI From set to the session.
- In midi studio+, open the voice dropdown and pick live.
- Browse suggestions, click chord blocks, drag design blocks — every audition now plays through your actual sound.
- When it works on the real patch, export → to clip.
Result: decisions made with the sound that ships — the audition was the instrument all along.
stack passes with render
One pass is an edit; stacked passes are an arrangement.
- harmonise: reharmonise the clip, then render — the new changes become the foundation, chords re-detect, blocks reset.
- Reharmonise that — or jump to design, which re-times the harmonised output.
- Add blocks, render again — the designed clip is now the foundation.
- Repeat until it stops getting better. ⌘/Ctrl+Z walks back through every bake.
- export → stages writes one item per pass, so you keep the whole journey.
Result: a part that evolved through iterations — each one auditioned, each one undoable.
a whole project in one sitting
Treat every MIDI clip in the Set without opening the window twice.
- Right-click any MIDI clip → midi studio+.
- Use the clip chip's ‹ › in the header to step through every distinct clip in the project
— duplicates folded into one entry (
×3). - Give each clip its treatment — each keeps its own processing as you move around.
- On export, set the source to all clips — every clip you touched writes in one pass, with apply to all duplicates covering the copies.
Result: a project-wide tidy-up — or reinvention — from a single window.
a break into a MIDI groove
An audio drum loop becomes MIDI you can play with anything.
- Right-click the audio clip → midi studio+. The hits appear as notes over the waveform, read as drums.
- Tune sense until every hit you care about is caught; raise min to drop the ghosts.
- Audition with the drums voice — or route it through your own kit via live.
- Take it to design for gate / ratchet / push if the groove wants motion.
- export → to tracks — the break is now MIDI on a new track, ready for any drum rack.
Result: the feel of the break, the flexibility of MIDI.
keyboard
Same keyboard language as sample studio+ — hands on keys, ears on the clip.
| key | does |
|---|---|
| 1 2 3 4 5 | switch tabs — analyse / suggest / harmonise / design / export. |
| space | play / pause the audition. |
| ← → | step ‹ › — patterns, suggestions, choices. |
| ⌘/Ctrl+Z | undo. Add ⇧ to redo. |
| Esc | cancel — close the window without writing. |
tips & gotchas
- The voice never prints. The audition instrument colours what you hear while you work — the clip keeps its own device chain. Pick whatever makes decisions easiest.
- Trust the ghosts. Grey notes are always the original — in suggest, in harmonise, in design. If the grey reads better than the colour, that's your answer.
- Lock before you reroll. On harmonise, lock the chords that work first — then ∗ only gambles with the rest.
- Quantise runs last. Snap the grid, then humanize on top — that's the intended order, so feel survives the cleanup.
- Patterns are windows. On long clips, every tab works on the pattern you're on — check the ‹ n / n › before you wonder where your edit went.
- Everything is one undo. Writes land as a single step in Live — experiment freely.
troubleshooting
I don't see the menu item.
Confirm Live is 12.4.5 beta+ and the .ablx is listed in Preferences → Extensions,
then restart Live. Right-click directly on a MIDI clip.
The key looks wrong.
Check the confidence % — short or monophonic clips read at lower confidence by nature. Click the key readout and set it manually; everything downstream follows your call.
The harmonise tab is greyed out.
By design on drum clips — chords need pitches. Analyse, suggest, design and export still work.
A suggestion changed more than I expected.
Hold original to see exactly what moved (the suggestion ghosts where it lands), and reset walks the whole tab back. Deeper suggestions are deliberately bolder.
Export wrote nothing where I looked.
Check which source was selected and, for .mid, the output folder —
reveal folder opens it for you. The file-list preview shows exactly what will be written.
Where do logs go?
The Extension Host log: on macOS ~/Library/Preferences/Ableton/Live x.x.x/ExtensionHost.txt,
on Windows %APPDATA%\Ableton\Live x.x.x\Preferences\ExtensionHost.txt.
stop second-guessing your harmony.
One clip in, endless directions out — read, suggested, reharmonised, designed and written back into your session. Built by Lux Cache, alongside sample studio+.
luxcache.com/midi-studio · Ableton Live 12 Suite · macOS / Windows